
You've seen them on Instagram and TikTok. Those perfectly organized notebooks with beautiful calligraphy, intricate doodles of coffee cups, and a "life-together" energy that seems almost impossible to achieve. You bought a notebook, maybe even a set of cute pens, but now... you are sitting at your desk, staring at a blank page, paralyzed by the fear of ruining it.
I have good news for you: Bullet Journaling (BuJo) is not about perfection. It is about play. And it is about function.
In 2026, the trend has shifted away from the stressful "Minimalist Hustle Culture" towards what we call "Kawaii Chaos"—a style that embraces cute stickers, fun colors, and simple layouts that actually help you get things done without becoming a second job. This guide is not just a list of steps; it is a permission slip to be messy, creative, and organized all at once. Let's build your 2026 companion together.

1. Why Start a Bullet Journal in a Digital World?
You have a calendar on your phone. You have Notes apps. Why carry a physical book?
Because digital tools are full of distractions. When you open your phone to check your to-do list, you see an Instagram notification, a text from your mom, and a breaking news alert. Suddenly, 20 minutes are gone.
A Bullet Journal is an offline sanctuary. It is a single-tasking tool in a multi-tasking world. The act of physically writing down "Buy Milk" or "Study for Math" engages your brain differently than typing it. It improves memory retention (this is scientifically proven!) and gives you a dopamine hit when you physically cross it out or put a cute sticker over it.

Bullet Journal vs Planner vs Digital Apps
| Tool | Best For | Main Drawback |
|---|---|---|
|
Bullet Journal
|
|
Requires setup time
You need to create your own layouts each week/month, which can take 15-30 minutes. |
|
Printed Planner
|
|
Not customizable
You're stuck with the pre-designed layout. If it doesn't fit your needs, you can't change it. |
|
Digital Apps
|
|
Easy to get distracted
Notifications from other apps can interrupt your planning flow. The "digital distraction" is real. |
If you enjoy creativity, need flexibility, and want a system that grows with you, a bullet journal is your best bet. It's particularly great for visual thinkers and those who benefit from the physical act of writing things down. Plus, the "Kawaii" approach makes it a joyful experience rather than just another chore.
Studies show that writing by hand activates the Reticular Activating System (RAS) in your brain, which helps filter and prioritize information. This makes you more likely to remember and complete tasks you've written down.
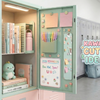
2. What Do You Actually Need? (The Kawaii Essentials)

You don't need to spend $500 to start. However, using tools that you genuinely love is the secret to consistency. If you love your pen, you will find excuses to use it.
The Notebook: Why GSM Matters
Do not buy a lined notebook (it feels like schoolwork) or a blank notebook (it's too hard to write straight). You need a Dot Grid Notebook. The dots are spaced 5mm apart, guiding your drawings and boxes but disappearing when you step back.
Crucial Tip: Look for paper weight. Standard copy paper is 80gsm. For a Kawaii Journal where you might use markers and stamps, you need 160gsm paper (like our store's premium line). Why? Because 160gsm is thick enough to prevent "Ghosting" (where you see the ink on the other side) and "Bleeding." You can paint on it, glue things on it, and it stays crisp.
The Pens: The Holy Trinity
The "Cheats" (Secret Weapons for Non-Artists)
This is where the Kawaii magic happens. If you can't draw, who cares? Use these cheats:
- Washi Tape: Instant borders and page dividers. No ruler needed. Just stick a strip of strawberry-patterned tape across the page, and you have a header background.
- PET Tape / Stickers: Use specific stickers for specific tasks. A "Trash Can" sticker for chores, a "Book" sticker for study time.
- Stencils: If you can't draw a perfect circle or a straight box, a cheap plastic stencil is your best friend.
- Stamp Pens: These pens have cute shapes at the tip (hearts, stars, flowers) that stamp when you press down. Instant decoration!
3. Step 1: Setting Up Your "Key" & "Index"
The "Key" is the legend or language of your journal. The original Bullet Journal system uses simple dots and dashes. That works, but let's make it cute.
Tip: Create a "Color Code" here too. Example: Pink Highlighter = Work, Blue Highlighter = Personal, Green = Money.
The Index: Leave the first 3-4 pages blank. This is your Table of Contents. This is the most underrated part of the system. Every time you start a new section (like "March Plans" or "Packing List for Tokyo"), write the page number here. You think you will remember where you wrote that password hint, but you won't. Use the Index.
4. Step 2 & 3: The Future Log, Monthly, and Weekly

Now we get to the core planning pages. This structure moves from the "Big Picture" down to the "Daily Details."
The Future Log (Year at a Glance)
Since you can't see the whole year at once in a notebook, you need a "Future Log." This is where you put birthdays, weddings, and holidays that are months away.
The Layout: Divide a double-page spread into 6 boxes (use your ruler or washi tape!). Each box represents a month. Do this twice to cover the whole year.
Decoration Tip: Don't just write "January." Use a sticker that represents the month (a snowflake for Jan, a heart for Feb, a Sakura for March) to make it visual instantly.
The Monthly Spread
At the start of every new month, you create a fresh "Welcome" page.
Left Page (The Cover): This is your creative outlet. Pick a theme! "Frogs," "Space," "Coffee," or "Sanrio." You don't need to draw it—just use a themed sticker pack.
Right Page (The Calendar): Draw a simple grid or a vertical list of days (1-30). Transfer events from your Future Log to here.
The Weekly Spread (The Workhorse)
This is where you live every day. Turn the page after your Monthly Spread.
Layout Idea: Divide the left page into 4 horizontal sections (Mon-Thu) and the right page into 3 sections (Fri-Sun) plus a "Notes" box.
The Concept of "Migration": This is crucial. If you wrote a task on Monday but didn't do it, look at it on Tuesday morning. Ask yourself: "Is this still important?" If yes, rewrite it on Tuesday (or draw an arrow ->). If no, cross it out. This active rewriting makes you mindful of how you spend your time.
How Many Pages Do You Actually Need Per Week?
This is one of the most common beginner mistakes: using too many pages.
- Minimal schedule: 1 page per week
- Work + personal tasks: 2 pages per week (most popular)
- Creative journaling: 3–4 pages per week
If you constantly run out of space, increase pages next week. If pages stay empty, scale down. Bullet journaling should adapt to your life — not pressure you to fill space.
5. Kawaii Decorating 101: How to Layer

This is the secret sauce that makes Kawaii journals look so textured and professional. It is called Layering. Don't just stick one sticker in the middle of the page. Build a scene.
The 3-Step Layering Technique:
- The Base (Background): Start with a flat piece of paper. This could be a torn piece of craft paper, a page from an old book, or a wide strip of solid-color Washi Tape. This anchors the decoration.
- The Texture (Middle): Add something visual. A stamp pattern, a grid washi tape, or a doily. Place this slightly off-center on top of the base.
- The Focal Point (Top): This is your main character. A large Hello Kitty sticker, a flower, or a quote. Place this on top, overlapping the other layers.
This creates depth and makes your journal look like a scrapbook, even if it only took 30 seconds to assemble.
6. Fun "Collections" to Try (Trackers & Lists)
Collections are lists that live outside your daily planning. They are the most fun part of BuJo because they are purely for you.
- Mood Tracker: Draw 30 small images (like boba tea cups, clouds, or balloons). Color one each day based on your mood (Pink = Happy, Blue = Sad, Yellow = Tired). At the end of the month, you have a data visualization of your mental health.
- Habit Tracker: A simple grid to track daily goals: Drank Water, Read 10 Pages, No Sugar, Skincare Routine.
- Stationery Wishlist: List all the pens and tapes you want to buy next (from my shop, obviously!). Rating them 1-5 stars helps you prioritize.
- "Brain Dump" Page: A chaotic page for phone numbers, random ideas, and scribbles that don't fit anywhere else. It keeps your weekly pages clean.
- Gratitude Log: Write 3 things you're grateful for each day. Studies show this simple practice can significantly increase happiness.
7. The Psychology Behind Why Bullet Journaling Works
Bullet journaling works because it combines three proven psychological principles:
- Externalization: Writing tasks down reduces mental load and anxiety.
- Visual Reward: Crossing off tasks triggers dopamine release.
- Commitment Bias: Handwriting creates a stronger sense of responsibility than typing.
This is why even simple, messy journals can dramatically improve focus and consistency — without needing artistic talent.
8. Common Beginner Mistakes (And How to Fix Them)

Don't quit just because of these bumps in the road. Every mistake is an opportunity for decoration.
Mistake #1: The "Ugly" Page
You made a spelling mistake, wrote the wrong date, or drew a crooked line.
The Fix: The Sticker Band-Aid. Do not rip out the page! It ruins the binding. Just put a big sticker, a piece of kraft paper, or a strip of washi tape over the mistake. Write on top of the tape. It's not a bug; it's a feature!
Mistake #2: "Ghosting" (Ink showing through)
You used a heavy marker and now the back of the page looks messy.
The Fix: Glue the two pages together to make one thick page, or paste a printable or a photograph over the back side to hide the bleed-through.
Mistake #3: The Comparison Trap
You look at Instagram and feel bad because your journal isn't a masterpiece.
The Fix: Remember that "IG BuJo" is art; "Real Life BuJo" is a tool. If your messy list helped you remember to buy eggs, it is a successful journal. Function comes first; cuteness is a bonus.
Your bullet journal is a personal tool, not a social media performance. It's okay if it's messy, incomplete, or filled with mistakes. What matters is that it helps you live a more organized and joyful life.
9. Frequently Asked Questions About Starting a Bullet Journal
Absolutely not! The original Bullet Journal system was created by Ryder Carroll, a product designer, not an artist. It was originally just black text and bullet points. The artistic element is optional. If you want it to look cute without drawing ability, rely on stickers, stamps, and collage materials.
It should only take 5-10 minutes. Spend 5 minutes in the morning (with your coffee) checking your tasks and visualizing your day. Spend 5 minutes at night "migrating" unfinished tasks or filling in your mood tracker.
Yes! That is the beauty of a blank notebook. You do not have to wait for January 1st. Start today. Just write the current month on the next blank page and go.
A5 (roughly 5.8 x 8.3 inches) is the "Goldilocks" size. It is big enough to plan your week comfortably but small enough to carry in a medium tote bag or backpack.
Messy handwriting has character! However, if it bothers you, try writing in all caps for headers—it instantly looks neater and more uniform.
Forgive yourself and turn the page. Do not try to "backfill" the empty days. Just write "Life Happened" across the empty space, decorate it with a funny sticker, and start fresh.
It doesn't have to be. Once you have a notebook ($20-$30) and a pen ($3), you are set for 6 months. You can build your collection of stickers and tapes slowly over time.
Ready to Start Your Kawaii Journey?
The perfect blank page is waiting for you. Grab the essentials and make 2026 your most organized year yet.
Shop Beginner BuJo Bundle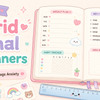