The Ultimate Guide: How to Use a Dot Grid Journal for Beginners
We have all experienced this exact moment. You finally purchased that gorgeous, thick-papered dot grid journal you have been eyeing for weeks. You sit at your beautifully arranged desk, uncap your favorite premium Japanese gel pen, gently press the journal flat, flip to the very first crisp white page... and freeze.
Staring back at you is a vast sea of tiny, perfectly spaced dots. Suddenly, your mind goes completely blank. You don't know where to start. You are terrified of making a mistake, drawing a crooked line, and completely ruining this beautiful, expensive notebook before you even begin. Welcome to what the global stationery community calls "Blank Page Anxiety."
If you grew up using traditional lined notebooks for school, transitioning to a dot grid can feel like stepping into the wilderness without a map. There are no heavy blue lines telling you exactly where to write. There are no pre-printed dates telling you what day it is. It is just you and the dots.

If you haven't bought your journal yet and are still deeply confused about the differences between dotted, ruled, and squared paper, stop right here! Read our ultimate Notebook Layouts Guide: Lined vs. Grid vs. Dot first to ensure you are making the right choice for your lifestyle. But if you already have your dotted notebook in hand and are ready to embrace total creative freedom, keep reading!
Today, Auntie Mei is going to permanently cure your blank page anxiety. I am going to show you the "invisible scaffolding" magic of dotted paper, reveal the exact tools you need to make your layouts look professionally designed, and walk you step-by-step through 5 genius ways to set up your very first dot grid pages.
Part 1: The Magic of the Dots - The Science of the BuJo Standard
Why did Ryder Carroll, the brilliant creator of the original Bullet Journal (BuJo) method, choose dotted paper over traditional horizontal lines or rigid square grids? The answer lies in a design concept called Invisible Scaffolding.
When you sit down and lean in close to write, the dots—which are universally spaced exactly 5mm apart in premium notebooks—provide a perfect mathematical grid. They act as a subtle guide for your pen, allowing you to draw flawlessly straight lines, perfectly measured habit tracker boxes, and incredibly neat handwriting. You can count the dots to divide a page into perfect halves or thirds without ever needing a measuring tape.
However, the true magic happens when you finish your layout. When you take a step back and look at the page as a whole, the light gray dots visually fade into the background. Your ink, your washi tape, and your colorful highlighters take center stage. Your layout looks like it was magically and effortlessly created on a pure, blank canvas.
Unlike a lined notebook (which forcefully dictates that you must write horizontally and ruins the look of vertical columns) or a grid notebook (which can make your personal diary look too much like a stressful high school math textbook), a dot grid journal gives you total aesthetic freedom without sacrificing structural neatness. It is the perfect marriage of logic and art.
Part 2: The Starter Kit (What You Actually Need)
To make your dot grid journal look like those incredibly aesthetic, highly organized Pinterest boards, a single standard black ballpoint pen simply won't cut it. You need the right tools to build your layouts effectively. Here is the Auntie Mei approved Starter Kit for conquering the dot grid:
1. The Soft Liners: Mildliners
Drawing thick borders and boxes with pure black ink can look harsh, messy, and unforgiving if you slip. Instead, use pastel highlighters (like Zebra Mildliners) to highlight the dots and create soft, aesthetic boxes. They offer a much higher margin for error and make your pages look warm and inviting.
Shop Mildliners2. The Precision Pen: 0.38mm Gel
Because the standard distance between dots is exactly 5mm, writing with a thick 0.7mm or 1.0mm pen will make your letters bleed together and look terribly cramped. You need a surgical, precise 0.38mm or 0.5mm Japanese gel pen (like a Uni-ball Signo or Pilot Juice) for crisp, legible lettering inside the grid.
Shop Precision Pens3. The Structural Tools
While the dots help you draw straight freehand, a small 15cm metal or acrylic ruler is essential for creating those satisfying, perfectly crisp boxes for weekly layouts. Combine this with beautiful Washi Tape to act as decorative borders or to instantly cover up any mistakes you make!
Shop Washi & ToolsPart 3: 5 Genius Ways to Use Your Dot Grid Journal (Step-by-Step)
Now that you understand the paper and have your tools ready, let's put pen to paper. Here are five of the most popular, effective, and beautiful ways to utilize the dot grid system. Do not try to do all of these at once; pick one or two that fit your current lifestyle.

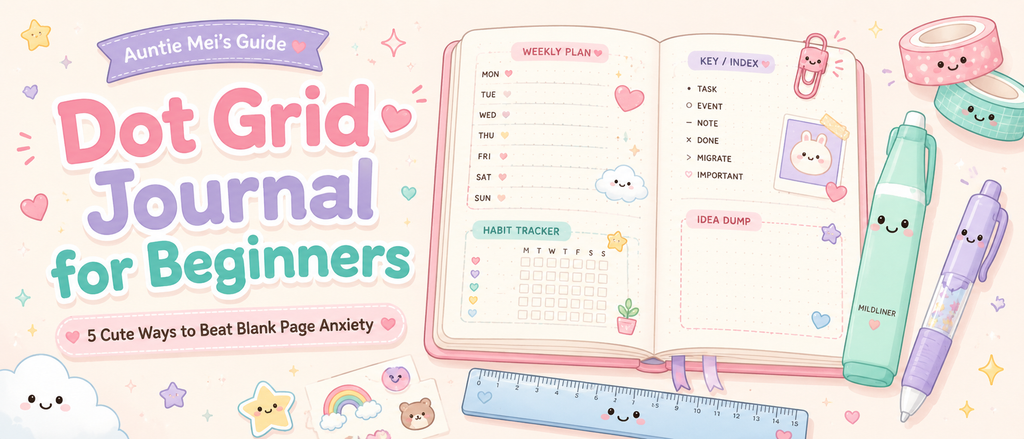
1. The Master Index & Key (The Command Center)
Because a dot grid journal has no pre-printed dates, you will be mixing up daily to-do lists, meeting notes, and grocery lists all in one book. To avoid losing your mind, you need an Index.
- Step 1: Dedicate the very first two pages of your new journal strictly to your Index (Table of Contents).
- Step 2: Use a ruler and your precision pen to draw a vertical line down the page, about 5 dots from the left edge. The narrow left column is for the "Page Number," and the wide right column is for the "Topic."
- Step 3: On the bottom corner of the page, draw your "Key." Use the dots to create a legend: Draw a single dot (•) to represent a Task, an (X) to represent a Completed Task, and a (>) to represent a task pushed to tomorrow.
2. The Minimalist Weekly Spread
This is where the mathematical magic of the dots truly shines. Creating a custom weekly planner takes less than 3 minutes once you know the secret.
- Step 1: Count the Dots. Count how many dots span horizontally across your two open pages. Let's assume you have 28 dots per page.
- Step 2: The Division Math. You need 7 columns for the days of the week. If you use a standard two-page spread, you have plenty of room. Decide how wide you want each day to be (for example, 8 dots wide).
- Step 3: Draw the Lines. Using your ruler and a pastel Mildliner, simply count 8 dots, draw a vertical line down, count another 8 dots, draw another line. You now have perfectly equal columns without ever touching a measuring tape!
3. The Ultimate Habit Tracker Matrix
A habit tracker is a visual grid where you color in a box for every day you successfully complete a habit (like drinking 8 glasses of water, reading for 20 minutes, or going to the gym). The dot grid is literally built for this.
- Step 1: Turn your journal sideways (landscape mode) if you track many habits.
- Step 2: Draw a large rectangle. The top horizontal axis should be 30 or 31 dots long (representing the days of the month). The vertical axis depends on how many habits you want to track (e.g., 5 dots tall for 5 habits).
- Step 3: Write the days (1, 2, 3...) above the horizontal dots. Write your habits (Water, Read, Gym) along the vertical edge.
- Step 4: Every evening, take your favorite colored marker and fill in the tiny 5x5mm square space between the dots for every habit you crushed that day. Watching the grid fill up with color is incredibly motivating!
4. The Advanced "Dutch Door" Layout
This is a slightly advanced but incredibly satisfying physical hack for your notebook. A "Dutch Door" involves physically cutting the pages of your journal to create a layered effect.
- Step 1: Open to a fresh two-page spread. On the right-hand page, use scissors to carefully cut away the top half of the page (following a horizontal line of dots to keep it perfectly straight).
- Step 2: You now have a mini "half-page" door that flips back and forth.
- Step 3: Write your massive, master weekly to-do list on the full page underneath. Use the flippable half-page to write your daily schedules. This allows you to flip through the days of the week while your master task list remains constantly visible in the background!
5. The Aesthetic Memory Scrapbook
Dot grid journals aren't just for cold, hard productivity. They are the perfect canvas for memory keeping and scrapbooking (often called "Junk Journaling").
- Step 1: Gather your physical memories: polaroid photos, coffee shop receipts, cinema tickets, and dried leaves.
- Step 2: Use the dots to perfectly align your photos so they aren't crooked. Tape them down using aesthetic, vintage-patterned Washi Tape.
- Step 3: Take sheets from your favorite Kawaii Memo Pads, write down your feelings about that day, and stick them onto the page. The dots will help you arrange multiple memo sheets in a perfectly satisfying, symmetrical grid.
Part 4: The 3 Deadly Mistakes Beginners Make

Before you dive in, let me save you a lot of heartache. After seeing thousands of journals, these are the three fastest ways to ruin your new dot grid notebook:
❌ Mistake 1: Using Alcohol-Based Markers (The Bleed-Through Disaster)
Never, ever use Sharpies, Copic markers, or heavy alcohol-based ink in a standard dot grid journal. The ink will instantly bleed through the paper, ruining not only the back of the page but often the next three pages underneath. Always stick to water-based markers (like Mildliners) or standard gel ink.
❌ Mistake 2: Tearing Out "Ugly" Pages
You made a spelling mistake. You drew a line that is slightly crooked. Your first instinct is to rip the page out and start over. Do not do this! Most premium dot grid journals are bound in signatures (groups of folded paper). If you rip out a page at the front, a page at the back will eventually fall out. If you hate a page, simply glue two pages together, or cover the entire page with a beautiful piece of scrapbook paper!
❌ Mistake 3: The Pinterest Paralysis
You spend 4 hours scrolling through flawlessly painted, watercolor Bullet Journal spreads on Pinterest, and you feel entirely inadequate. Remember: those influencers spend hours creating one page for social media. Your journal is a functional tool for your real, messy life. Start with simple black ink and a single highlighter. Let the system work for you before you worry about making it a masterpiece.
The Planner Page Cheat Sheet
Still not 100% sure if the dot grid is your true soulmate? Use this quick reference chart to compare the standard notebook interiors before you make your final purchase.
| Page Type | Level of Structure | Best Used For | Do You Need a Ruler? |
|---|---|---|---|
| Dot Grid | Medium (Invisible scaffold) | Bullet journaling, habit trackers, custom weekly spreads, flexible layouts. | Highly recommended for long, crisp lines. |
| Lined / Ruled | High (Strictly horizontal) | Traditional dear-diary journaling, fast school note-taking, writing essays. | No, the lines do the work for you. |
| Square Grid | High (Mathematical look) | Technical engineering drawing, learning complex Japanese/Chinese characters. | Optional, as the printed lines are usually quite bold. |
| Blank | None (Total freedom) | Pencil sketching, watercolor painting, free-form mind mapping. | Yes, definitely, if you want your text to be straight. |
Part 5: Overcoming Perfectionism (The Final Word)
Here is the most important lesson Auntie Mei can teach you today: Your dot grid journal is a functional tool, not a museum exhibit.
If you draw a wonky line, if your pen smudges because you closed the book too fast, or if you misspell a word in your beautiful calligraphy header—let it go. The true beauty of an analog journal is that it intimately reflects your real, imperfect, chaotic life. Accept the mistakes. Slap a cute piece of washi tape or a sticker over the error, laugh it off, and turn the page.
Dot Grid Journaling FAQ
The core point of a dot grid journal is to provide "invisible structure." The printed dots guide your pen to draw perfectly straight lines, symmetrical boxes, and neat habit trackers. However, once your ink is on the page, the light gray dots visually fade into the background. It offers the strict neatness of a grid notebook combined with the aesthetic, open freedom of a blank page.
It is actually much easier than writing on completely blank paper! Simply use a horizontal row of dots as your invisible baseline. Rest the bottom curve of your letters directly on the imaginary line connecting the dots. For highly consistent handwriting, try to keep the height of your lowercase letters (like 'a' or 'e') exactly half the vertical distance between two dots.
Absolutely. While they are famous in the Bullet Journaling community, dot grids are fantastic for high school and university students. The dots allow you to write standard text paragraphs easily, but they also make it incredibly simple to quickly draw perfectly proportioned graphs, geometry diagrams, and structural flowcharts during a fast-paced lecture without needing separate graph paper.
Because the standard distance between dots is exactly 5mm, writing with bold pens can get cramped very quickly. You should use a fine-liner or a precision Japanese gel pen between 0.38mm and 0.5mm (like the Zebra Sarasa, Pilot Juice, or Pentel EnerGel). For drawing borders and filling in boxes, pastel highlighters (like Zebra Mildliners) are highly preferred over black ink for a softer, more forgiving aesthetic.
It depends entirely on your end goal. If your primary objective is to only write long, continuous paragraphs (like a traditional dear-diary entry or writing a novel draft), a lined notebook is faster and requires less focus. However, if you want to create to-do lists, daily planners, mood trackers, draw charts, and add decorative washi tape, a dot grid journal is vastly superior because it doesn't force your designs into strict horizontal rows.
You don't absolutely *need* one, but it is highly recommended if you love the crisp, minimalist aesthetic. The dots make it very easy to draw a reasonably straight line freehand (by simply connecting the dots with your pen), but using a small 15cm metal or acrylic ruler against the dots will give you perfect, flawlessly sharp boxes for your weekly layouts that look professionally printed.
Mistakes happen to everyone! First rule: Do not use messy liquid white-out, as it severely ruins the texture of the paper, takes forever to dry, and permanently covers the guiding dots. The best planner hack is to use a high-quality, dry correction tape. Or, even better, embrace the mistake and cover it completely by taping a beautiful piece of aesthetic memo pad paper or a strip of wide floral washi tape directly over it!
